Showing posts with label challenge. Show all posts

Thursday, 15 December 2016

Heather: Speedy makes and December sew far

Once again it's been a month since I shared my makes with you (really, where has 2016 gone?), but it's been a really productive month at the sewing machine, so I thought I'd give you a bumper roundup of some of my recent makes. Each of these projects were "speedy sews", made in a single evening, or in some cases, just a few hours! Hopefully you'll feel inspired. 
 

Velvet Burnout Party Dress
 
First up is Threadcount 1613 made up in a sparkle velvet burnout fabric, made up in around 4 hours. I made quite a few adjustments to this pattern, particularly on the back panels and shoulders, both of which were shortened and tweaked by about an inch to get a more precise fit in the bodice. The fabric itself is quite firm- it has stretch but behaves more like a stretch denim than a jersey- but this allowed for a really close fit without compromising my ability to breathe! 

I'm not normally a fan of a peplum, always believing them to make my bum look big, but I pinned this one together and was pleasantly surprised with the fit and styling, so it made the final cut!


Floral Heather Dress
 
Next up, a version of the Heather Dress by Sew Over It (I had to!). Again, a one-evening make as I had already made a version in red sweater knit for practice and I was able to make the entire garment on the overlocker. The fabric is a heavy weight jersey with a low % stretch. The slightly lower than required stretch meant that I needed to allow a little more room over the bust and across the arms than the previous version. I also made two simple alterations to this pattern, adding a cuff to the sleeves (cut sleeves shorter, sew a rectangle of fabric, short edges together, fold lengthways, attach to sleeve!) and a slightly deeper neck band for a roll neck effect. This dress is so comfortable that I want one in every colour!


Stripy Jumper Dress
 
My next speedy make was a self drafted jumper dress made after work on a Friday evening (started at 4.30) and worn out to dinner the very same night (at 6.30!). The pattern started life as a simple shift dress from Burda, to which I added a grown on sleeve, to make, essentially, a giant t-shirt! I've made this pattern up before in black and white ponte and it's a real wardrobe staple for warmer days in the office, so when I saw the pink and navy stripe I knew exactly what I wanted to make. On this version I lengthened the sleeve to the elbow and then added a panel for the lower sleeve. I also added a wide neckband for an extra level of coziness! 
  

Dashwood Annabelle 
 
And last, but by no means least, we have Annabelle, the absolutely gorgeous new floral dress I whipped up last weekend to wear out for lunch with my Nanna. The pattern was free with December's Love Sewing Magazine and the design was quite straightforward. The new Paper Meadow range by Dashwood has some beautiful coordinating fabrics and I knew straight away I wanted to use these together. I also picked up some orange cotton lawn to use as the lining and set to work! As usual I shortened the back length by about an inch at the lower back, and also at the shoulder by 1/4". I did also adjust the front bodice length slightly at the neckline, deepening the curve by about 1/2". I started sewing after Saturday night's Strictly and was at the restaurant by Midday on Sunday! 


-
All of the fabrics used were sourced from Fabric Corner at the Craftea Sewing Bee Shop, 22-24 Melville St, Lincoln. Call in for your next speedy sewing project!

Tuesday, 5 July 2016

Heather: Colette Macaron Summer Spots

Back in May Bridie and I bumped into the lovely Lucy from Sew Essential at The Big Simplicity Blog Meet in Manchester. Sew Essential is a comprehensive and easy to browse fabric and haberdashery site with a huge range of both dressmaking and crafting patterns, from indie brands as well as the big boys; high quality dressmaking fabrics (at prices that don't trigger a call from the bank) and even sewing machines and accessories (basically they have all the things and I want one of everything...).

If you're not a follower of the independent pattern circuit, Colette Patterns produce "Sewing patterns that teach" and have been on my wish list for a while. They have some unusual shapes and styles, and even better they seem to be designed to fit real people- with bums and everything! The pattern packets themselves are rather lovely too. Each package contains a detailed instruction booklet and a multi-sized pattern which is printed onto tissue- much preferred to the heavier paper that is becoming very popular. The pattern is stored in a special pouch in the back of the packet, which is stitched up along the edge to form a booklet to keep everything together. I can just imagine a selection of these sitting on my shelf like tiny books!


Already in love with the pattern, a quick look on Pinterest reassured me that the pattern would lend itself to almost any combination of fabrics, so I was rather excited to find this 100% cotton poplin fun printed spot fabric I could team up with some plain white cotton from my stash. I washed the fabric before using and there was no shrinkage or colour run, though obviously being 100% cotton it did need a good steamy press once it was dry!
Pale Blue multi-spot print cotton poplin fabric from Sew Essential.  
Checking my measurements, I decided to cut the pattern graded from a size 0 at the bust, size 4 at the waist through to a size 8 at the hip. Now before you start worrying for my health, I should point out that the size 0 on these patterns is not in any way indicative of high street dress sizes. The 0 measures B33 W25 H35 which is much more like a size 8-10 from one of the major pattern companies.

Following the instructions (who is this girl?) I created the front and back bodice sections first. The pattern calls for the bodice sections to be turned under 1.5cm along the top edge, positioned over the front and back yoke pieces and then top stitched together. For both the front and back sections I tacked the bodice sections in place and checked for fit before committing my final stitches. The front bodice fitted really nicely, but the back ended up being almost 2 inches too long in the back. Luckily this pattern rather lends itself to alterations- you can just see the stitching line in the picture below showing the final position of the bodice back section. 


The skirt front has two pockets concealed into a slashed dart behind the outer pleats (sounds technical, right?). I used the spot fabric for the pocket back (most likely to be seen) and a polyester lining for the inner half to reduce bulk over the tummy. Whilst I've constructed plenty of pockets before I found the particular instructions for these pockets to be the most clear and easy to follow of any of I've tried previously. The pockets went in perfectly first time with no hassle. 

Once the pockets were constructed, a concealed zip was inserted into the side seam. The sleeves are constructed from two pieces sewn right sides together and pressed to create a smooth sleeve hem. And there we have it; Hey Macaron-a...!


Pleased to have taken the extra time to get the back fitting really nicely!

Here are some tips for you, if you're thinking of having a go at the Macaron dress:

  • Don't be frightened to grade the pattern across several sizes to get a better fit
  • Personally I found the shoulders to be very narrow on the size 0 despite the fit being excellent elsewhere. Check the measurements before you cut!
  • This pattern would totally work without sleeves, or you could lengthen the sleeve to just above the elbow for a more formal look. 
  • I'm only 5'3" and this dress sits well above the knee. You may want a longer version!
Personally, I wouldn't change a thing about my dress! I'm already planning a winter version with some checked wool and denim. In fact, I think I'll have one in every colour!

--
The fabric and patterns used in this blog were kindly provided by Sew Essential. Browse the site at www.sewessential.co.uk

Sunday, 19 June 2016

Heather: Mum's Simplicity Garden Party Dress

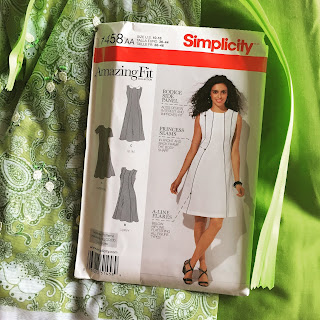
Back in May Bridie and I headed up to Manchester for The Big Simplicity Blog Meet. At the event Simplicity launched their sewing challenge for 2016, which consists of 4 patterns and 5 sewing categories. You can read about them here. I selected the dress pattern and headed over to Fabric Corner to select my fabrics.

Simplicity 1458. Image courtesy of Simplicity
I opted for version B and I was looking for a fabric that was eye catching but relatively easy to work with. The pattern suggests light to medium weight woven fabrics but when I spotted this green paisley-printed, embroidered stretch mesh I knew it was the right thing. (I know, I know, that fabric is neither easy to work with, nor a light to medium-weight woven... but this is supposed to be a challenge, right?!) I found a remnant of green cotton hiding at the back of a shelf and also picked up a fantastic bright green concealed zip.


I headed home, excited by my upcoming make. And then my Mum turned up. Now, I should say that my Mum is an extremely capable sewer and was the first person to pop me in front of a sewing machine and encourage me to have a go (not to mention indulging my incessant stealing of pop socks to make jersey-dresses for Barbie... more on that another day maybe), which means that I couldn't say no when she spotted the fabric and this happened...


So, that's how my green mesh dress became Mum's Garden Party Dress.

Next step was choosing the pattern pieces. This pattern is part of the 'Amazing Fit' range which includes separate front pattern pieces for cup sizes B-DD, and individual back pattern pieces for slim, regular and curvy fit. Even though I've sewn for Mum before I took a new set of measurements and made just a couple one alteration to the pattern, shortening the back length by 1/2". At this point I also altered the sleeve by adding 3 inches at the shoulder seam at the sleeve hem to create a more fluted sleeve.

I made up my toile using the green cotton that would ultimately for the inner layer of the garment. The pattern gives facing pieces fro the neck and armhole which were omitted. If you're reasonably confident on the fit, using a lining is a great way of fitting a garment without needing to make a full toile in muslin. The cotton is also pretty forgiving if it requires unpicking. As expected, at the first fitting I only needed to make slight alterations to the fit, adding a small amount of extra wearing ease at the waist and widening the neckline slightly, as I had decided to move the zipper channel under the arm.

Now for the stretch mesh. I am lucky to be in possession of a rather lovely Janome 8002DX overlocker which was an absolute essential for this fabric. Having transferred all of the alterations from the toile I quickly whipped up the outer layer using the overlocker only, trimming the seam allowances on the machine. The small embroidered flowers on the fabric did present a challenge but a slow speed and perseverance paid off.

I assembled the remainder of the garment treating the cotton layer as the lining, resulting in the exposed seams being enclosed between the mesh and the lawn. I was concerned this would show through to the outer garment but this wasn't the case. I inserted the sleeves and added an invisible zip, finally finishing the hem and sleeve hem with a rolled hem stitch on the overlocker. 


The finished garment went down a storm! Mum and I spent a rather amusing afternoon in her garden trying to get some pictures of the dress 'in use'. Mum's not a fan of being in front of the camera so I told her she could have one garden prop to make her feel more comfortable. I was thinking a watering can, but she went for a branch!


--
The fabric used in this post was kindly provided by Fabric Corner Lincoln, based at The Craftea Sewing Bee Shop, 22-24 Melville Street Lincoln, and at Lincoln's Historic Central Market.