Tuesday, 5 July 2016

Bridie: June's Sewing Round Up


A round up of all the things I've made in June (and a little of July). I hope you enjoy.


Here are all the things I've been making in June (and a tiny bit of July). Hope you enjoy, feel free to ask me any questions or let me know what you think.
I mentioned where I got these fabrics from in the Vlog but here are the links I promised.


Craftea Sewing Bee their website is 


but check out their Facebook page as they are constantly adding new stock on their and are really quick to respond if you need help.


The pattern I used for my pyjamas was Simplicity 1502

Heather: Colette Macaron Summer Spots

Back in May Bridie and I bumped into the lovely Lucy from Sew Essential at The Big Simplicity Blog Meet in Manchester. Sew Essential is a comprehensive and easy to browse fabric and haberdashery site with a huge range of both dressmaking and crafting patterns, from indie brands as well as the big boys; high quality dressmaking fabrics (at prices that don't trigger a call from the bank) and even sewing machines and accessories (basically they have all the things and I want one of everything...).

If you're not a follower of the independent pattern circuit, Colette Patterns produce "Sewing patterns that teach" and have been on my wish list for a while. They have some unusual shapes and styles, and even better they seem to be designed to fit real people- with bums and everything! The pattern packets themselves are rather lovely too. Each package contains a detailed instruction booklet and a multi-sized pattern which is printed onto tissue- much preferred to the heavier paper that is becoming very popular. The pattern is stored in a special pouch in the back of the packet, which is stitched up along the edge to form a booklet to keep everything together. I can just imagine a selection of these sitting on my shelf like tiny books!


Already in love with the pattern, a quick look on Pinterest reassured me that the pattern would lend itself to almost any combination of fabrics, so I was rather excited to find this 100% cotton poplin fun printed spot fabric I could team up with some plain white cotton from my stash. I washed the fabric before using and there was no shrinkage or colour run, though obviously being 100% cotton it did need a good steamy press once it was dry!
Pale Blue multi-spot print cotton poplin fabric from Sew Essential.  
Checking my measurements, I decided to cut the pattern graded from a size 0 at the bust, size 4 at the waist through to a size 8 at the hip. Now before you start worrying for my health, I should point out that the size 0 on these patterns is not in any way indicative of high street dress sizes. The 0 measures B33 W25 H35 which is much more like a size 8-10 from one of the major pattern companies.

Following the instructions (who is this girl?) I created the front and back bodice sections first. The pattern calls for the bodice sections to be turned under 1.5cm along the top edge, positioned over the front and back yoke pieces and then top stitched together. For both the front and back sections I tacked the bodice sections in place and checked for fit before committing my final stitches. The front bodice fitted really nicely, but the back ended up being almost 2 inches too long in the back. Luckily this pattern rather lends itself to alterations- you can just see the stitching line in the picture below showing the final position of the bodice back section. 


The skirt front has two pockets concealed into a slashed dart behind the outer pleats (sounds technical, right?). I used the spot fabric for the pocket back (most likely to be seen) and a polyester lining for the inner half to reduce bulk over the tummy. Whilst I've constructed plenty of pockets before I found the particular instructions for these pockets to be the most clear and easy to follow of any of I've tried previously. The pockets went in perfectly first time with no hassle. 

Once the pockets were constructed, a concealed zip was inserted into the side seam. The sleeves are constructed from two pieces sewn right sides together and pressed to create a smooth sleeve hem. And there we have it; Hey Macaron-a...!


Pleased to have taken the extra time to get the back fitting really nicely!

Here are some tips for you, if you're thinking of having a go at the Macaron dress:

  • Don't be frightened to grade the pattern across several sizes to get a better fit
  • Personally I found the shoulders to be very narrow on the size 0 despite the fit being excellent elsewhere. Check the measurements before you cut!
  • This pattern would totally work without sleeves, or you could lengthen the sleeve to just above the elbow for a more formal look. 
  • I'm only 5'3" and this dress sits well above the knee. You may want a longer version!
Personally, I wouldn't change a thing about my dress! I'm already planning a winter version with some checked wool and denim. In fact, I think I'll have one in every colour!

--
The fabric and patterns used in this blog were kindly provided by Sew Essential. Browse the site at www.sewessential.co.uk

Sunday, 19 June 2016

Heather: Mum's Simplicity Garden Party Dress

Back in May Bridie and I headed up to Manchester for The Big Simplicity Blog Meet. At the event Simplicity launched their sewing challenge for 2016, which consists of 4 patterns and 5 sewing categories. You can read about them here. I selected the dress pattern and headed over to Fabric Corner to select my fabrics.

Simplicity 1458. Image courtesy of Simplicity
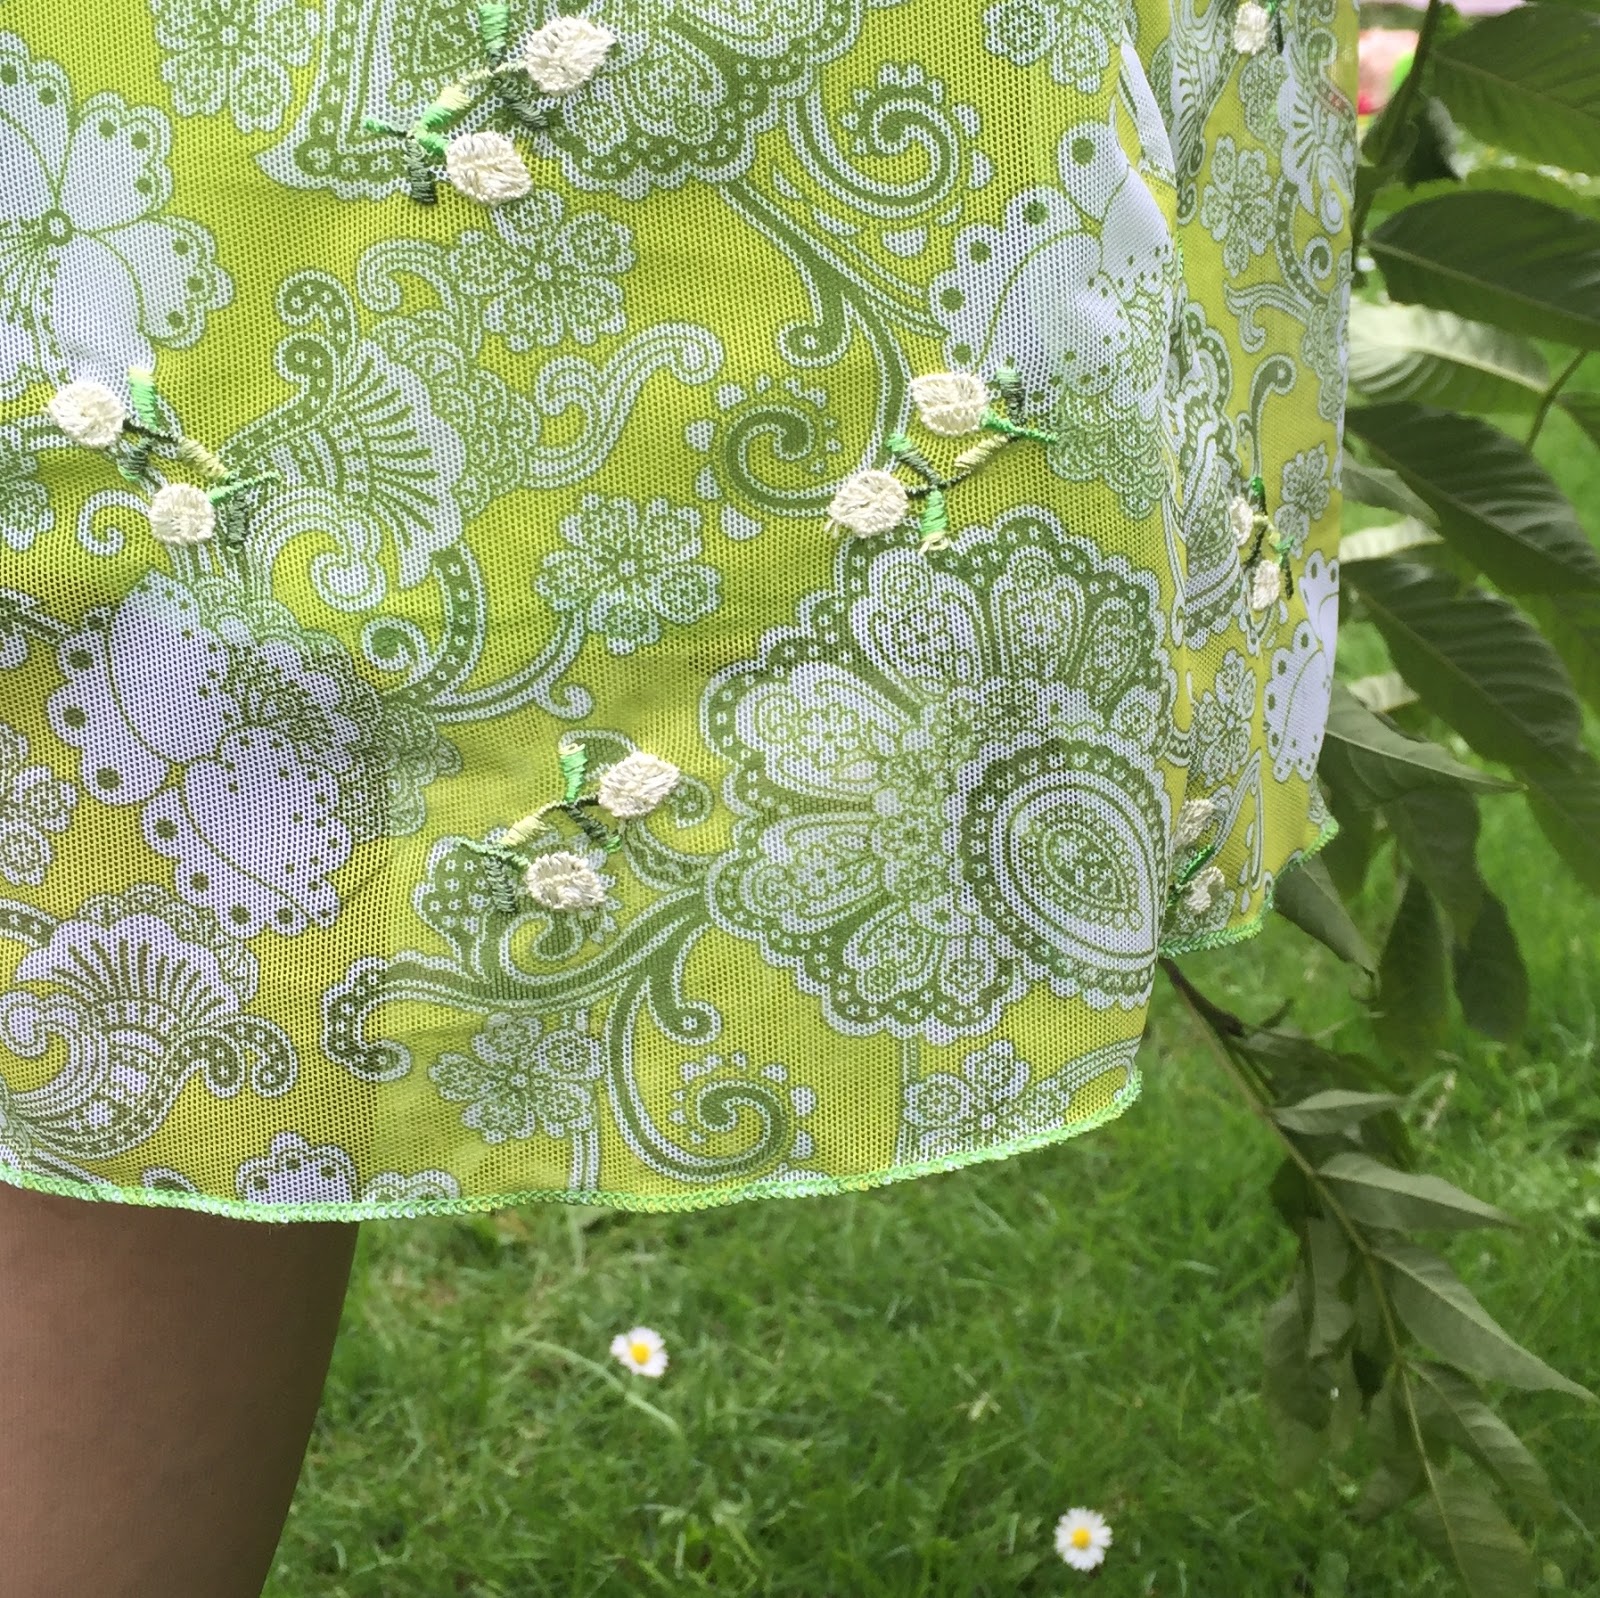
I opted for version B and I was looking for a fabric that was eye catching but relatively easy to work with. The pattern suggests light to medium weight woven fabrics but when I spotted this green paisley-printed, embroidered stretch mesh I knew it was the right thing. (I know, I know, that fabric is neither easy to work with, nor a light to medium-weight woven... but this is supposed to be a challenge, right?!) I found a remnant of green cotton hiding at the back of a shelf and also picked up a fantastic bright green concealed zip.


I headed home, excited by my upcoming make. And then my Mum turned up. Now, I should say that my Mum is an extremely capable sewer and was the first person to pop me in front of a sewing machine and encourage me to have a go (not to mention indulging my incessant stealing of pop socks to make jersey-dresses for Barbie... more on that another day maybe), which means that I couldn't say no when she spotted the fabric and this happened...


So, that's how my green mesh dress became Mum's Garden Party Dress.

Next step was choosing the pattern pieces. This pattern is part of the 'Amazing Fit' range which includes separate front pattern pieces for cup sizes B-DD, and individual back pattern pieces for slim, regular and curvy fit. Even though I've sewn for Mum before I took a new set of measurements and made just a couple one alteration to the pattern, shortening the back length by 1/2". At this point I also altered the sleeve by adding 3 inches at the shoulder seam at the sleeve hem to create a more fluted sleeve.

I made up my toile using the green cotton that would ultimately for the inner layer of the garment. The pattern gives facing pieces fro the neck and armhole which were omitted. If you're reasonably confident on the fit, using a lining is a great way of fitting a garment without needing to make a full toile in muslin. The cotton is also pretty forgiving if it requires unpicking. As expected, at the first fitting I only needed to make slight alterations to the fit, adding a small amount of extra wearing ease at the waist and widening the neckline slightly, as I had decided to move the zipper channel under the arm.

Now for the stretch mesh. I am lucky to be in possession of a rather lovely Janome 8002DX overlocker which was an absolute essential for this fabric. Having transferred all of the alterations from the toile I quickly whipped up the outer layer using the overlocker only, trimming the seam allowances on the machine. The small embroidered flowers on the fabric did present a challenge but a slow speed and perseverance paid off.

I assembled the remainder of the garment treating the cotton layer as the lining, resulting in the exposed seams being enclosed between the mesh and the lawn. I was concerned this would show through to the outer garment but this wasn't the case. I inserted the sleeves and added an invisible zip, finally finishing the hem and sleeve hem with a rolled hem stitch on the overlocker. 


The finished garment went down a storm! Mum and I spent a rather amusing afternoon in her garden trying to get some pictures of the dress 'in use'. Mum's not a fan of being in front of the camera so I told her she could have one garden prop to make her feel more comfortable. I was thinking a watering can, but she went for a branch!


--
The fabric used in this post was kindly provided by Fabric Corner Lincoln, based at The Craftea Sewing Bee Shop, 22-24 Melville Street Lincoln, and at Lincoln's Historic Central Market.


Sunday, 12 June 2016

Bridie: My Sewaholic Gabriola Skirt


So a while ago I went a bit crazy buying PDF download patterns I think I bought 3 in one day, my excuse was it was Black Friday so got some good deals, but still a little excessive especially as I didn't have a project line up for them yet. I had a feeling I would get round to using them and I was right. Last months Sew It Yourself Meet Up Mini Challenge was to create a skirt and when I remembered I had the Sewaholic Gabriola Skirt I knew it would be perfect.


This skirt requires a lot of fabric about 3.5m for 60 inch width and about 5m for 45 inch width fabric. I wanted to make a wearable toile as that's quiet a lot of fabric to for a first attempt at a pattern. So I raided my stash and found this amazing fabric that was my Grandmas. I believe its a crepe de chine but I could be wrong. The important thing was it draped beautifully and there was meters and meters of it (I still have a good meter let)  


So after a lot of sticking, the only downside to PDF patterns is how long it takes to put them together, I was ready to go. The fabric I used required a lot of pinning while cutting as its very slippery on one side. Got there in the end though, well I thought I had turned out I'd missed out a full side panel. Luckily I had enough fabric left to go back and cut it out. Highly annoying though! 


It was defiantly one of the fiddlier garments I've made what with lining up all the panels in a fabric that didn't want to cooperate. I'm just glad I wasn't pattern matching that would of been a nightmare! Overall very pleased with it. I think the fabric was well worth the extra effort and the panels give the skirt a beautiful shape!


I do think next time I'm going make it a size smaller. I took it in a little at the waist which I think it needed and also requires a lot chopping off the hem for me and I'm about average height. They're easy issues to fix !


To get a real idea of how lovely this pattern is you have to see it in motion!


I hope you've enjoyed this post!

Happy Sewing x

Sunday, 5 June 2016

Heather: The Big Vintage Sew Along


The Big Vintage Sew Along is an annual blogging event organised by McCall Pattern company. Each year they choose a selection of reproduction vintage patterns from their range and invite the sewing community to have a go at reproducing these vintage styles. You can find out more about the project here.

If you've read some of my older blogs over at Dresstoration you'll know I'm a vintage fan, so when I received details of the challenge I knew I wanted to get involved. I picked out this lovely 1930s coat-dress which I thought would suit my style. 

From the moment I started cutting the pattern out I knew this garment was going to be tricky. If you look closely at the pattern diagram you'll see there are curved darts of the hips and shoulders. This is not a feature I've ever attempted before, so I decided to make a toile of the bodice in some leftover muslin, to check I could get the curves right.

I started with my usual method of checking the garment fit against my pattern block. I shortened the bodice back by 2cm at the seam, and the front by 2cm at the shoulder. Having cut out the pieces from muslin and battled for about 30 minutes to get the curves to fit together nicely, I thought it might be a fun idea to read the instructions... (I have inherited this bad habit from one of my parents. Clue: It's not my Mum.) 

This dress has an unusual feature, in that almost all of the seams are joined together with a line of top stitching/edge stitching rather than the classic right-sides-together method. This means that those lovely curved darts are actually created by pressing under the curves and then lining them up with their corresponding partner before edge stitching in place. Not easy. (Big thanks to Amy from Almond Rock who set me on the right track here! See her version of this dress here.

Having figured out what I was supposed to be doing I stitched up my toile, with promising results.


Happy with the fit, I rooted through my stash and found some tan cheesecloth in a perfect 1940s brown, which I thought would make a lovely summer version of the outfit. I also opted to shorten the sleeves at this point for the same reason.

I started by making up the back of the garment. The curved edges were tricky but not impossible, and aided significantly by the purchase of an adjustable zipper foot which allowed me to align the edge of the foot which the edge of the fabric perfectly. The instructions suggested using a contrast thread for the visible stitching so I went for a soft coral pink, as I knew it would match a pair of vintage-looking shoe boots I picked up from Office a few years ago. 

The majority of the garment assembly was straightforward and before long I had 90% of a completed garment, just awaiting the attachment of the collar and front panels. This is where things started to get a little tricky. On the front of the garment there are two tiny pockets. See them? No, I didn't either. They are actually hidden behind the top two curves of the bodice and creating them involves a lot of pins and pressing and tacking (and swearing). Finally I got to this point: the front top stitching.


There are some learning points here: 
1. I should have tacked these beastly darts in place rather than sewing straight from pins.
2. I should have overlocked the edges of every piece before I even started this exercise.
3. You can't press cheesecloth enough times- it will always looked like you just screwed it into a ball.
4. Cheesecloth was not the right fabric for this dress.

The fabric moved around a lot whilst stitching. It pulled out of shape in some places, and there are some definite hidden holes under those seams from my stitch unpicker.
But I finished it. It was really tricky, and there was definitely a point that I was ready to consign this to the pile of never-to-be-finished UFOs. 
But I persevered, and I'm so pleased I did...

Check out those shoes!


You can just make out the contrast edge stitching here.


Hand stitched arrow heads on each dart.

--

Why not have a go at your own vintage challenge?

Wednesday, 1 June 2016

Heather: #mmmay16 Roundup

Those of you who follow our Sew It Yourself Facebook page will be no stranger to "Me Made May"; an event in the sewcial calendar which encourages sewists to wear their handmade items throughout May, and post about them online. Every pledge is different- some people decide to post every day, some just once a week. I decided to try and post every day so here is my roundup!


Now, the keen-eyed amongst you will see there are only 27 photos... Well, Bank holidays don't count, right?! ;)

Did you take part in #mmmay16? How did you get on?

Sunday, 22 May 2016

Heather: Perfect Peacocks and Disastrous Draping

Calling in to Fabric Corner a couple of weeks ago I was drawn to a beautiful petrol coloured crepe which I decided would make a perfect project for May. Looking around the store for something to complement it, this beautiful peacock feather Liberty lawn stood out and I began planning my project.
 
And then I planned some more. And some more. I was really struggling to decide what to make; a term I affectionately named "sewists's block" for about a week.The fabrics were so beautiful that I came up with at least 9 different project ideas before I finally made my decision.

In fact, the decision came a little easier with the arrival of the latest edition of Love Sewing Magazine and the accompanying Pussy Bow Dress. I had already made a version of the dress (see a later post) and really liked the shape of the bodice, so I decided to make a sleeveless version of the blouse. 
 
I started by tracing out a copy of the blouse pattern (minus the sleeves) and checking the fit against my pattern block. I then split the front bodice piece down the centre front and added a button stand, also altering the neck facing to match. 

Anyone who has ever worked with Liberty cotton lawn knows that it's an absolute dream to work with. It doesn't usually lose any size, body or colour in the wash and it drapes beautifully. Consequently the main garment pieces were cut out and ready to go within less than 20 minutes. The petrol coloured crepe, however, had its own ideas about how it should be used and I had a real battle on my hands to lay the fabric both flat and straight both at the same time. Finally, using my cutting mat, rotary cutter and all the pins I could find, I finally managed to cut the length for the bow.

Assembling this garment is pretty straightforward- centre darts front and back and bust darts, side seams, shoulder seams and that's 90% of the construction completed. Not contented with a straightforward make I spotted this plum scallop edged trim in the haberdashery (yes, it is meant for knickers, but I don't like to be pigeonholed 😉) and added it to the edge of the front panels where the buttons would meet. 

 
I then attached the facings to finish the neckline and added the neck tie. The armholes were finished by simply turning under 1cm- not my preferred option generally but it seemed to work for this garment. I dug some teal buttons out of the button stash, and voilá!


Buoyed by my blouse success I quickly searched my pattern stash for a suitable skirt pattern. Empty-handed, I then resorted to searching Pinterest (what would we do without it?) and discovered a fun draped skirt from Burda which was available as a pattern download to print at home. A general fan of Burda, I decided to give it a go.

 
Image reproduced from Burdastyle.com

First of all, this pattern was probably a bit ambitious for 8pm on a Sunday evening, and consequently my make was littered with mistakes. The first challenge was the pattern layout. The skirt is a wrap style and requires the back panel (there is 1 piece included in the PDF) to be used twice, attached to both the front right and front left panels at the pattern stage to eliminate the need for a side seam. Being a hater of waste, I found it really hard work to lay out the pattern on the (constantly moving) fabric, eventually resorting to marking the outlines on the crepe with pins and chalk. (I know the seasoned sewers amongst you are screaming "why didn't you just trace out a second back piece?" No idea. I'm screaming it too). Finally I got all of the pieces on to my fabric and began cutting out.

Now, I've made quite a lot of patterns from Burda, see my previous post for evidence, but in my slightly fatigued state I forgot that one golden rule... check the seam allowances. Burda are well known for not including seam allowances in their patterns but this had completely slipped my mind (and of course I hadn't bothered to read the instruction pages, which would be my ultimate downfall). Thankfully I had opted for a slightly generous fit on my measurements, so I persevered, constructing the pocket sections, adding darts and joining the centre back seams without issue. I hemmed the skirt at this point as the crepe was beginning to fray.

You'll notice from the pattern diagram that the front pleats sit over the waistband rather than joining underneath it. This technique involved partially attaching the waistband, then folding the pleats over the waistband, and finally sewing the bottom of the waistband by hand. The waistband pieces are not included in the PDF and need to be drawn out onto the (by this point, dreaded) fabric. Skimming the instructions (you can see where this is going, right?) I cut out my waistband strips and merrily attached them to my skirt. After much pressing and a few choice words I realised that I had, once again, forgotten the seam allowances.

 
At this point I went to bed.

The next evening I fixed my mistakes and finished off the skirt. I'm not sure whether it was the knowledge of the mistakes I had made, or just general frustration, but I was really unhappy with the finished skirt. Sadly I think this one is destined for the recycling pile.
 

I read so many blogs that talk about great makes and technical skills and design, but very few hold their hands up to a disastrous make. For anyone who had ever read similar articles and been disheartened when things don't go right, please know it happens to all of us.

--
The fabric used in this post was kindly provided by Fabric Corner Lincoln, based at The Craftea Sewing Bee Shop, 22-24 Melville Street Lincoln, and at Lincoln's Historic Central Market.