Showing posts with label vogue. Show all posts

Saturday, 24 September 2016

Heather: Badgley Mischka Wedding Outfit

Today I attended the wedding of some good friends (Congratulations Mr and Mrs S!) and, of course, I was wearing handmade! 
My hunt for a pattern worthy of the occasion started on the pattern pages at Sew Essential. I particularly like Sew Essential's website for browsing patterns because you can search both by type of garment, and by designer. I don't know about you, but I find it frustrating when I have to flick between lots of brands to find what I want- I just want to look at ALL of the dresses! In the end, my inspiration came from Sew Essential's twitter post:
@sewessential: New season Vogue #sewingpatterns now in stock here https://t.co/mNys0VIOhf there are some beauties! @McCallPatternCo
Vogue 1513
— Sew Essential August 18, 2016
Once I had finished swooning over the pattern I set out to look for a suitable fabric (Of course, there was nothing suitable in my stash...). Now you'll recall from a few posts ago that Sew Essential have a great selection of dressmaking fabrics, and I was really spoiled for choice choosing a suitable fabric (they really are all gorgeous). I finally whittled my 15-strong selection down to this beautiful smudged paint print by John Kaldor in a polyester Crepe de Chine. 
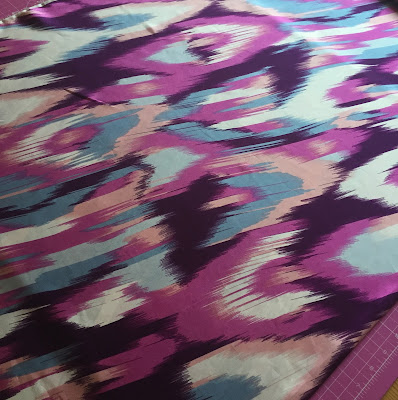
John Kaldor Cassandra fabric available at Sew Essential.
The fabric has really beautiful drape making it perfect for the shoulder detail on the dress. It also means that it's pretty slippery, so my first step with this pattern was to trace out all of the pattern pieces in the correct sizes onto dot and cross paper, and in the full size rather than on the fold. This meant that I didn't have to battle with the slippery fabric in two layers. I made up a toile using some peach viscose lining fabric which was a little crisper than the crepe de chine, and I hoped this would give the dress some body. 

It turns out that making a toile was a pretty good idea! I started with a size 6 graded through to a 14 at the waist and hips. I shortened the back shoulder length by an inch and reshaped the armholes for comfort. Once I had completed the toile I then proceeded to resize the waist of the dress back down to a 10/12- it was huge! I also made some minor adjustments to the top of the princess seam under the arms (this detail will be important later) to improve the fit across the bust. 

Happy with the toile fit I made the alterations to the paper pattern and cut my dress out with my trusty rotary cutter and cutting mat. It still moved around a lot, but was certainly easier than using scissors. I assembled the main garment and then cut out the drape, finishing it with a machine-rolled hem for a neat finish. 

Drape detail.
I hadn't cut the drape out when I did the main dress cutting, as I wanted to avoid any excess fraying. It turns out that this is, yet again, one of those times where I should have read the instructions... You're supposed to insert the shoulder drape into the front right princess seam, tack it in place around the armhole and neck, and then attach into the centre back. Of course, I had already stitched and overlocked all of these seams... cue stitch unpicker.

The second challenge with the drape was the fit. Remember all of those tiny tweaks I made around the armholes earlier? Turns out I needed to transfer those onto the drape too, as the drape fits closely into the shape of the armhole. I had removed about an inch from the armhole depth and length you can see in the picture below that the underside of the drape hangs about 2 inches lower than the top layer.  Desperate to avoid reshaping from the bottom of the drape and ruining my rolled hem, further unpicking was required.

Drape detail
The rest of the make was much smoother. I finished all of the seams with the overlocker and hand stitched the hem. I even found time to make a matching fascinator, and asked my friend to design me some matching nails!


Here's the finished dress in action. What do you think?


--

The fabric and pattern used in this blog were kindly provided by Sew Essential. Browse the site at www.sewessential.co.uk

Sunday, 5 June 2016

Heather: The Big Vintage Sew Along


The Big Vintage Sew Along is an annual blogging event organised by McCall Pattern company. Each year they choose a selection of reproduction vintage patterns from their range and invite the sewing community to have a go at reproducing these vintage styles. You can find out more about the project here.

If you've read some of my older blogs over at Dresstoration you'll know I'm a vintage fan, so when I received details of the challenge I knew I wanted to get involved. I picked out this lovely 1930s coat-dress which I thought would suit my style. 

From the moment I started cutting the pattern out I knew this garment was going to be tricky. If you look closely at the pattern diagram you'll see there are curved darts of the hips and shoulders. This is not a feature I've ever attempted before, so I decided to make a toile of the bodice in some leftover muslin, to check I could get the curves right.

I started with my usual method of checking the garment fit against my pattern block. I shortened the bodice back by 2cm at the seam, and the front by 2cm at the shoulder. Having cut out the pieces from muslin and battled for about 30 minutes to get the curves to fit together nicely, I thought it might be a fun idea to read the instructions... (I have inherited this bad habit from one of my parents. Clue: It's not my Mum.) 

This dress has an unusual feature, in that almost all of the seams are joined together with a line of top stitching/edge stitching rather than the classic right-sides-together method. This means that those lovely curved darts are actually created by pressing under the curves and then lining them up with their corresponding partner before edge stitching in place. Not easy. (Big thanks to Amy from Almond Rock who set me on the right track here! See her version of this dress here.

Having figured out what I was supposed to be doing I stitched up my toile, with promising results.


Happy with the fit, I rooted through my stash and found some tan cheesecloth in a perfect 1940s brown, which I thought would make a lovely summer version of the outfit. I also opted to shorten the sleeves at this point for the same reason.

I started by making up the back of the garment. The curved edges were tricky but not impossible, and aided significantly by the purchase of an adjustable zipper foot which allowed me to align the edge of the foot which the edge of the fabric perfectly. The instructions suggested using a contrast thread for the visible stitching so I went for a soft coral pink, as I knew it would match a pair of vintage-looking shoe boots I picked up from Office a few years ago. 

The majority of the garment assembly was straightforward and before long I had 90% of a completed garment, just awaiting the attachment of the collar and front panels. This is where things started to get a little tricky. On the front of the garment there are two tiny pockets. See them? No, I didn't either. They are actually hidden behind the top two curves of the bodice and creating them involves a lot of pins and pressing and tacking (and swearing). Finally I got to this point: the front top stitching.


There are some learning points here: 
1. I should have tacked these beastly darts in place rather than sewing straight from pins.
2. I should have overlocked the edges of every piece before I even started this exercise.
3. You can't press cheesecloth enough times- it will always looked like you just screwed it into a ball.
4. Cheesecloth was not the right fabric for this dress.

The fabric moved around a lot whilst stitching. It pulled out of shape in some places, and there are some definite hidden holes under those seams from my stitch unpicker.
But I finished it. It was really tricky, and there was definitely a point that I was ready to consign this to the pile of never-to-be-finished UFOs. 
But I persevered, and I'm so pleased I did...

Check out those shoes!


You can just make out the contrast edge stitching here.


Hand stitched arrow heads on each dart.

--

Why not have a go at your own vintage challenge?