Showing posts with label bright. Show all posts

Saturday, 12 November 2016

Heather: African Adventures

The last few weeks since our holiday have absolutely flown by and I have been holed up in the sewing room with a couple of really special secret sewing projects (try saying that three times quickly!), which I hope to share with you at some point in the future. In between circles of chiffon and layers of lace I managed to squeeze in a quick selfish sew in this stunning African Wax Print from Fabric Corner.

Unsurprisingly, I picked this fabric with absolutely no idea what I would make with it, (stash? What stash?) but without doubt that it was too good to leave behind. If you've handled african wax print before you'll know that the fabric itself is quite stiff- the texture is like a good quality wrapping paper. It has movement but doesn't drape, and it didn't really soften in the wash. After sitting in my stash for several weeks an event came up which I knew the fabric would be perfect for and I set about finding an appropriate pattern. A quick research on Pinterest for pattern inspiration found a whole host of elaborate wax print dresses with full skirts, fitted bodices and, often, exceptional pattern matching. No pressure then. 
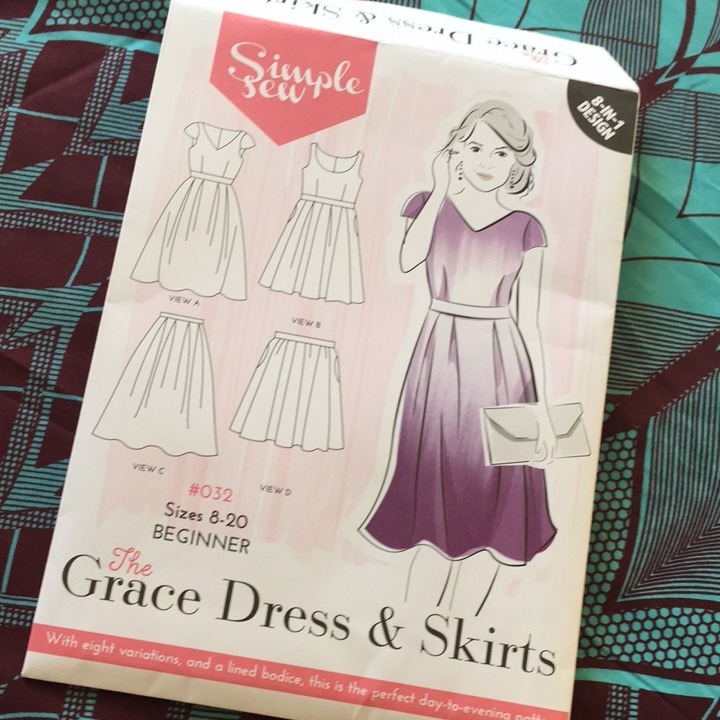
Looking at the images shared by others I realised I needed to make a full skirt with pleats rather than gathers, and a simple bodice that would show off the pattern without too many seams. A search through my pattern stash came up short, and just as I was about to fetch my trusty pattern block to begin drafting I picked up a copy of Love Sewing magazine with the free Grace Dress pattern on the front. Fitted bodice and full pleated skirt? Perfect!

Now, I've had a fair bit of experience with pattern matching to date but this print was really a level above. I wanted to make the most of the varied print sections on the fabric and use the heavy border mostly in the skirt. After tracing out the entire pattern as 'full size' pieces (i.e. not on the fold), moving them about on the fabric for about an hour and wishing I had a longer ruler to line up the stripes with, I decided to abandon the skirt pattern pieces in favour of drafting the skirt from scratch. I started by working out the finished garment length, and then marking a chalk line along the full 2m length fabric. I then chose the detail I wanted for the centre point of the skirt, marking this again with chalk, eventually dividing the full two metres into one large and two slightly smaller rectangles. I shaped the waist slightly and then stitched the blocks back together to make the basic skirt. I was pretty pleased with the pattern match in the side seams!
Can you spot the seam?
I made up a quick toile of the bodice to check the fit. Simple Sew patterns are known for being quite roomy but this looked quite small and I was right to be wary- I made a few adjustments and increased the waist size by reducing the back darts, and swinging some excess from the armscye into the waist to get a really good fit. I did include the short capped sleeves on my toile but the shape totally didn't fit me (maybe I have fat shoulders?!) so I drafted a split sleeve instead once again inspired by pinterest.
They look like giant moustaches! 
I spent a considerable amount of time choosing how to place the pattern on the bodice, and used a reverse pattern piece (also known as a piece of paper with a bodice shaped hole in it) to work out where the pattern would sit, eventually deciding on two strong lines either side of the centre at the waist. I pleated the skirt panel to match the pattern from the bodice- much easier than trying line up pleats from the pattern piece.

Pattern matching the skirt and bodice.
I made the waistband out of a single strip of fabric, so it was important for the bodice fit to be perfect before I attached it- no going back once the waistband was cut!


Pattern match through the waistband. 

I took my time to make sure the pattern matching was exactly right!
Pattern match through the zip.
Sleeve detail.
So after a number of weeks of waiting to show this beauty off the special event finally arrived and here is my dress! I can't pretend I'm not super proud of this one! The pattern itself was so simple but the addition of such a bold pattern really set me a challenge. And I loved every second of it.


--
The fabric used in this post was kindly provided by Fabric Corner Lincoln, based at The Craftea Sewing Bee Shop, 22-24 Melville Street Lincoln, and at Lincoln's Historic Central Market.

Wednesday, 10 August 2016

Heather: Project Runway "Missoni" dress

It's been a little while since my last post, due in part to holidays, and also to some very challenging projects! So I thought I'd take a few minutes to show you this gorgeous zigzag lace dress that I made back at the end of July. 

I was given the pattern at the Big Simplicity Blog Meet back in May and didn't really think I'd ever use it, but when I spotted the fabric, which is really similar to the picture, I thought I'd give it a go.


The fabric is from Fabric Corner in Lincoln and was a remnant piece from a heap of individual pieces of lace that were all equally tempting! I was particularly attracted to this one because it had a beautiful zigzag selvage that I thought I could incorporate into the hem somehow. Several people have asked me if it's a Missoni fabric; It isn't, but happy to pretend!

As I mentioned, this was a pretty challenging project. The lace fabric was extremely slippery and the very bold print meant I really had to ensure that the pattern matched throughout the garment. I started off by tracing out the required pattern pieces onto dot and cross paper, making a full sized piece for all of the pieces marked to cut on the fold. This made lining up the stripes much easier!

I checked my size against the finished garment measurements and opted for a size 4 across the shoulders out to a size 10 at the waist and a size 14 across the hips. Once I laid the pattern onto the fabric I realised that I didn't have quite enough fabric to line up all the pieces, but also that the pieces looked really huge, even though the dress is intended to have an elasticated waist. Returning to the pattern I discovered that it had been designed with 8.5 inches of ease! 8.5! I proceeded to reduce the pattern pieces down to sizes 4-6-8 to remove a lot of this ease. I also shortened and re-curved the hemline by 8 inches at this point, so that the front would fall just on the knee and the dropped hem at the back would fall to mid calf. 

Once I had cut out all of the pieces and lined up every possible zigzag, I cut the same pieces out in a fine purple cotton lining. This isn't called for in the pattern instructions, but the fabric was far too sheer to go without, and the neckline would not have lent itself to a slip. From here on the majority of the construction was completed on the overlocker which handled the fabric beautifully. 

One of the most interesting features of the dress is the neckline. The halter style is created by inserting three curved neckline pieces into a channel, rather than using a strip or fabric or ribbon. For the channel section I cut away the lining fabric at the seam allowance to prevent bulk. 
Pattern matched through the neck facing!
Finished centre back fastened with covered buttons and hand stitched button loops. 
The dress has an elasticated waist sewn into another channel which I created between the lining and outer layers. Two long strips of fabric then form ribbons which pass through these (pattern matched) button loops and are tied together in a bow at the back.

The hemline detail was my main focus throughout the creation of this dress. Having made my wedding dress a few years ago I'm no stranger to attaching a lace hem, but I knew this was going to be hand-stitch hell. To get the selvage from the fabric I used small, sharp scissors to cut around the zig zag design for the full 1.5 metre length of the edge. The edge of the garment is overlocked and then the lace trim was placed over the top, lined up with the design and then hand stitched to create an almost invisible finish.
The selvage stitched on to the hem.
And here is the finished garment! It has turned out even more lovely than I could have hoped!


 Here I am wearing the dress on a recent trip to Harrogate.


---

The materials for this project were sourced at the Craftea Sewing Bee Shop at 22-24 Melville Street, Lincoln. The pattern was kindly donated by Simplicity Patterns.


Monday, 11 July 2016

Heather: Abstract Date Night Dress

Summer is coming! Well at least it is in my sewing room, thanks to this fabulous abstract print date night dress, which promises to bring the sunshine with it*. For my latest White Tree Fabrics project I decided to choose an item that would fill some of the gaps in my casual wardrobe. Followers of my instagram will know that I love a smart, fitted dress for work, and a well-tailored shift dress is my ultimate wardrobe staple, so I wanted to step out of my comfort zone a little. Plus, the Abstract Print Cotton Poplin fabric particularly appealed to my more ditsy side! (come one, we've all got one.)

*This fabric claims no meteorological influence... more's the pity!

Date Night Dress & Slip by April Rhodes in Abstract Pink Cotton Poplin both from White Tree Fabrics

Now I'll confess, I hadn't heard of April Rhodes patterns before I browsed the White Tree site. In fact, White Tree carries a whole host of indie patterns and it's great to find such a comprehensive UK stockist. I was particularly drawn to the floppy sleeves on this dress, but in fact I was pleasantly surprised with this pattern overall. The pattern pieces are printed on a fairly heavy paper, designed so that you trace your own pattern from it, and sizing is from XS to XL. As you will have read (hopefully!) in my previous blog posts I usually have to grade a pattern to fit my slightly-smaller-than-average bust and more-than-slightly-larger-than-average bum. For this pattern I went for XS at the bust through to M at the hips, but then tapered back in to an XS at the hem to avoid looking like a (glamorous) lampshade. 

The instructions have photo illustrations, in colour, in a little booklet, and really well thought out instructions meaning that this already super-easy make went together like a dream!

This dress is actually constructed of two garments; the outer dress layer and a coordinating slip underneath. The slip is constructed of two identical pieces, whilst the outer garment has front, back and sleeve pieces, all of which are constructed using french seams. Now, I'm not a french seam fan. I know, I know, it's proper sewing and they make clothes look really nice on the inside and they stop the seams from fraying... but I've owned an overlocker for over 10 years, and who's got the time to stitch everything twice...?! Anyhow, in the interests of a true pattern review I overcame my general disdain for the technique and (following the instructions) did probably the best french seams of my life... "Hello, my name is Heather and I'm a french seam convert".

The majority of the outer garment constructed, and hems finished during the process rather than left to the end, I had the task of making some bias binding to use both as a facing and on the slip. I've made my own continuous bias several times thanks to this really handy free bias binding calculator from So Sew Easy. Who knew you could get almost two metres of binding from a 12" square remnant?! Cotton poplin makes particularly good binding as it has just enough 'give' to bend around the curves, but enough weight to be easily controlled during the stitching process. 

Bias binding detail on the slip.
The slip can just be seen under the arms. it is an integral part of the garment- don't skip it!
This pattern is really intended for a drapy fabric, but I really think the 100% cotton works!. The dress is called the 'Date Night Dress' but the cheerful fabric creates a totally different look. It makes me want to grab a stripy towel and head off to find the nearest candy floss stand at the beach! It's going to be ideal for that really hot summer that's just around the corner...


Happy sewing everyone!

--

 The pattern and fabrics in this post were kindly provided by White Tree Fabrics. 
If you fancy your own sewing challenge, here's a little something for you. Just enter the code SIY challenge for 20% off and free P&P when you order from www.whitetreefabrics.com